Showing posts with label fitting. Show all posts

Tuesday, November 8, 2016

Creating Dream Jeans: Getting Closer to Finishing the Ginger Jeans

We can shop for hours, days, or even weeks to find the perfect pair of jeans.  So it should come as no surprise that we decided to take the leap to make a pair ourselves. It was time to take a shot at making our dream jeans with all of the qualities and fit we've been searching for.  In late summer we started on a pair of Ginger Jeans by Closet Case Files by making a wearable muslin. Read that blog here!

We don't always use muslins for fittings, but when it comes to creating dream jeans, you better believe we are taking our time with fitting. We usually skip making a muslin when sewing patterns for knits or less fitted garments and make adjustments as needed on the final fabric, this is because the fit is more forgiving.

If you read back on our previous post about our muslin fitting, you'll see that we started with Version A of the Ginger Jeans - a low to mid-rise cut with a stovepipe fit in the leg. I was impressed with the fit of the Ginger muslin, but decide that I would prefer the higher-rise of View B. We decided it would be best to do an additional fitting on the final pair before Laurel finished them completely.

So we're back to the fitting room to make sure the fit is as dreamy as possible. What's the point of putting all that work into a pair of jeans and having the fit be a miss? To prepare for the final fitting, there are some aspects of the garment that can be done ahead of time. Laurel had a great time working on the bright blue topstitching and we are loving the pop of color!

Shop our neon topstitching thread here!
We chose a neon blue topstitching thread to go with our deep blue stretch denim, and every little thread shows, especially the wonky ones. Whenever your machine does develop a mind of its own and goes a little off, try to take a deep breath and let it go. In reality, nobody will see the mistakes that you do.


As you can see, we finished the fly front zipper, so we will not be adjusting our fit in the front panels for obvious reasons! We also sewed up the back seam, but did not finish it off with top stitching, so if we need to adjust the fit we can expand or narrow the seam. We also raised the pockets from our muslin fitting - pocket placement is everything for a flattering back view!


For the side seam allowance, we added a little width at the waist. Skinny jeans should be a snug fit, and we're guessing these might fit well in the hips but have gaps in the waist. We used a basting stitch to sew the two side seams and the inseam.


Let's give them a try!


This final fitting is important if we want our jeans to have the polish we expect. With the perfect fit, I'll be able to dress these jeans up for work with a blouse and blazer, or worn casually with a cozy sweater. The fabric is so soft and has a great stretch. Laurel should be able to take these back to her studio and put on the finishing touches.  I can't wait!

Want to make your own pair?
Try one of our amazing jean kits which include all the notions and findings you need.


Creatively Yours,
Suzan


Tuesday, July 14, 2015

Finding the Right Fit

One of the main reasons that we sew is to create a garment that fits us correctly. Most sewists will agree that getting a pattern to fit is the toughest part of sewing garments for yourself since our bodies are so different from the "fit model" and dimensions of the pattern.

19 years ago, I began our sewing school at Stonemountain & Daughter to help home sewists get the right fit, by having instructors on hand to help mark changes when you try on a garment, to teach students how to choose which size to make then adjust by measurements, and learn the easiest and best techniques for garment sewing. We offer over ten different classes focusing on different garments to fit (Make a Well-Fitted Pants Pattern, Make The E.S.P Dress, Fitting The Plus Bust) as well as our general sewing classes, perfect for continuing students, where you can bring in your own project and learn how to get the right fit (Beginning & Beyond, Mini Beginning & Beyond, and the ever popular and versatile Sew & Fit Lab).

Many beginner to intermediate sewing students give up altogether on sewing when their garments don't fit right and the idea of "how to fix it" is daunting. Because the challenges of pattern fitting can be so frustrating, we love when Sandra Betzina is back at Stonemountain teaching us how to fit a pattern or showing off her new patterns.

You always learn something new at a Sandra Betzina class. With her teaching style of no-nonsense, practicality, not too detailed or loaded with complex theories. Just great hints and tips on how to make a better fitting garment, she is the perfect guide through the puzzling world of pattern fitting. It doesn't matter how experienced a seamstress you may be, you still have something to learn from Sandra.

Laurel, an accomplished sewist for over 50 years, joined us for Sandra's Pattern Fitting class and I asked her what she nuggets of knowledge she acquired. Here the four NEW things she learned from Sandra's class:

1) Darts are a good thing.
It's perfectly acceptable to add a dart at any place in the garment.  Sometimes we can get too hung up on the original design of the garment and think that by adding or removing details from the pattern, we're ruining the original idea of the pattern designer. Adding darts to an armhole or neckline changes the way the bust or back fits, often for the better.
Quote by Charles James, American designer, at the High Style exhibit at the Legion of Honor in San Francisco 

2) Use the "lengthen or shorten here" lines.


Those little lines on your patterns are there for a purpose of a better fit.  Go ahead and cut that pattern on that line and add your length instead of trying to cut the shoulders shorter, the sleeve longer or the crotch deeper, which can create additional fit issues that are harder to correct. Just remember: whenever you lengthen or shorten, narrow or widen, add or subtract to one pattern piece, you will have a corresponding pattern piece that will also need to be adjusted so that the seams match up correctly. This means you will be adjusting more then one pattern piece.

3) The grain line on a pattern is THE most important feature on a pattern.
There's a reason why you lay a pants pattern on the straight grain line of the fabric: They will NOT hang well if the grain line is off and even a tiny difference to the grain line will make all the difference in the world for a great looking pant.


4) Once you have a pattern that works great, don't risk having that flimsy paper tearing. Iron on fusible interfacing to make your pattern durable.
Preserve your pattern pieces by applying a fusible interfacing fabric to the backs of the pieces.  Don't use steam to apply it or your pattern will shrink. What a great hint, given that many of us use the same pattern over and over again.


Most of the tips, hints and how-tos that Sandra covered in her class are detailed in her books Fast Fit and Power Sewing Toolbox 1 & 2.
Remember the 1-Hour dress by New Look (6347) that we had such a time fitting?  We're making it again and this time with a better fit. 
New Look 6347


This time we're using a gorgeous rayon batik from my stash. This dress would be great in any flowing rayon or soft drapey fabric!

Now that Laurel has a dress form in my size, fondly named Zanikan (fyi, my nickname is Zan - short for SuZan), she is able to make some changes to the pattern so that the dress will fit better.  

Another of Laurel's takeaways from listening to Sandra was that fitting at the bust is crucial.  In the original New Look 6347 dress we made, that bust darts were too low. So Laurel started on this second dress with fitting the point of the bust dart where it should be first and adjusting the rest of the pattern from there.


We are also adding a zipper down the back, even though the original design did not call for it.  The use of the zipper will allow me to get in and out of the dress so we can fit the back and waist to my torso.

Whatever your making, if you're not sure of the fit, then make a muslin first (we've said it before, and we'll say it again)  Once you have the perfect fit in your pattern, you will use it over and over again (a perfect excuse to iron on fusible interfacing, like Sandra said!). 

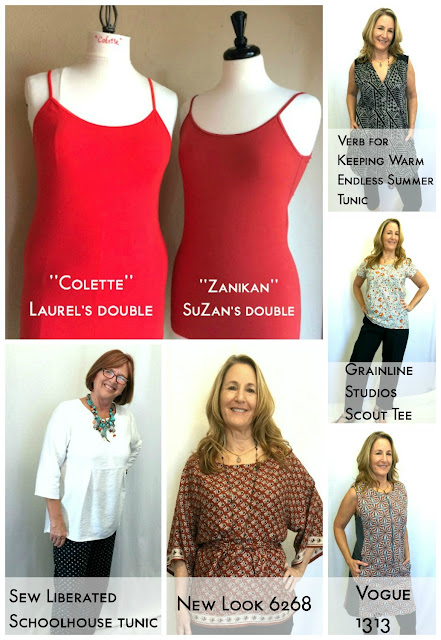
Having a dress form helps, Laurel admits. Both Zanikan and Laurel's Colette are a mainstay in her studio and boy, has she been cranking out the garments - some for her, most for me (yay!).
Verb for Keeping Warm Endless Summer Tunic, Grainline Studio Scout Tee, Vogue 1313, New Look 6268, Sew Liberated Schoolhouse Tunic

Creatively yours,
SuZan

We are also super excited to have Sandra Betzina back for an inspiring Fashion and Fabric Trunk show to inspire you on Thursday October 22, 2015 at 6:30. Please go to our website for more information. You can call us directly to register at 510-845-6106. Hope to see you then for this fabulous party and opportunity to play with Sandra in her "favorite" fabric store! 

Please email me at fabriclady3@gmail.com if you want more information about a class or the find the perfect class for you!

My fabulous team is now blogging at stonemountainfabric.blogspot.com

Here is a little bit of the latest blog and I encourage you to follow us there as well!


Stonemountain Style Hacking: Finding Inspiration In Ready-Made Fashion

It's summer and the fashion magazines and retailer catalogs are out in full force, touting breezy, comfortable, beautiful clothes. We are finding endless inspiration, flipping through these images and imaging how easy many of these outfits are to make. This post is all about dissecting and breaking down a ready-made or ready-to-wear outfit, so you too can say, "I can make that!"

 To best re-create these styles, or to hack them, we look at three very important elements:

  1. Take note of the cut of the garment and drape of the fabric (i.e. where the seams are and how the fabric falls on the body).
  2. Search our pattern books to find a similar style to the garment we wish to recreate. 
  3. Search Stonemountain for a fabric that best matches the fiber, drape, weight, and overall look of the inspiration piece. 
to read more, please click over to stonemountainfabric.blogspot.com

Tuesday, October 7, 2014

Do Your homework - The muslin!

Marie Antoinette in her Muslin
Before cutting pieces from the final fabric, a dressmaker may test the fit of a garment, using an inexpensive muslin fabric, thereby avoiding potential costly mistakes. This garment is often called a "muslin," and the process is called making a muslin. In this context, the term, "muslin" has become the generic term for a test or fitting garment, regardless of what it's made from.

In previous posts, we have mentioned the importance of making a muslin, especially when you're using a pattern that you've not tried before.  No matter how much you sew or how many garments you have made, pattern designers all have their own concepts of how a particular garment should fit. Making a muslin is the only way to insure that your garment will fit you the way you want it to. Isn't that why we sew for ourselves, anyway?

Remember the pants we were going to make out of a lovely wool? The muslin proved that this pattern was not going to look good on my body, no matter how great it fit.


Our New Look 6013 dress is another perfect example of why it's important not to assume that your customary pattern size will have a good fit.  This pattern is a basic sheath dress with a raglan sleeve - it's meant to hug the body, so proper fitting is important.


Cutting out the muslin should be just as precise as the layout and cutting of the actual finished fabric - otherwise, proper fit could still be an issue.


Certain pattern pieces can be skipped in the muslin stage, as an option.  For instance, we did not make a muslin of the facing pieces.


Here is why we make muslins: this pattern is my normal size, but look how much extra fabric there is in the body of the dress...we are so glad that we took the time to do a muslin test - this could have been another fitting disaster!


Pinning and marking the muslin shows us where we will adjust the final pattern of the fabric. Me thinks Laurel looks a little stressed, but she assured me that this process is well worth spending time to ensure a good fit.


After the muslin fitting, we know exactly where we will be adjusting the pattern pieces. The final garment will fit like a glove, all because of the care we took in the initial stages.

I am super excited about this dress! Stay tuned to see how we funk it up a bit...

Creatively Yours,
Suzan
fabriclady3@gmail.com
Stonemountain & Daughter Fabrics
www.stonemountainfabric.com

Thursday, January 30, 2014

Dreamy Cotton Voile Blouse - "Sew Perfect, Sew Sweet!"

Some things never go out of style.  They may disappear for a season or two, but you know what they say - if you keep something around long enough, it will come back in style. The classic button up blouse is one of those garments. The styling details may vary from year to year, but a blouse always has a place in your wardrobe.

What is great about a blouse is that there are so many fabric possibilities. Cottons, linens, silks and even synthetic fabrics can be used - it just depends on what you plan to wear with it. I wanted an easy blouse to go with skirts, slacks and jeans. But more than that, I wanted to use this dreamy little voile crepe print.  It is soft and somewhat sheer - the perfect blend for a Spring blouse. (Did I say Spring? Can you believe I'm already dreaming of that?!)


Come to think about it, Ruth our ace sales associate and owner/designer at Kiki Ramone, loved this fabric as well - she also made a blouse using République Du Chiffon's Margot Chemise pattern ...
The website and pattern are in French. Oh, la la!
I chose a classic pattern from NewLook - #6407 - it features three-quarter length sleeves and a fitted bodice. The hemline is curved upwards at the sides similar to a man's shirt.


Everyone has an optimal length in tops, one that flatters their figure. I like my tops to be at least 15" from the armhole, so I asked Laurel, my dressmaking muse and fellow blogger over at Laurel's Quill, to cut it a little longer.


Blouse patterns, especially those with collars, cuffs and front facings have a lot of pieces. It is tempting to lay the pieces out haphazardly on the fabric to conserve yardage. However, paying close attention to the direction of woven fabrics is important. As this photo from Draping: The Complete Course by Karolyn Kiisel shows, fabric hangs differently in a garment, depending on how it is laid out on the fabric grain.


So when a small piece, such as my blouse collar, asks for using the lengthwise of the fabric, there must be a good reason for it. I'm thinking that too many times collars don't always lay down properly and this careful grain placement might have something to do with it.


There's always something new to learn with each garment. Keep in mind that the pattern instructions may tell you to do one thing and after you do it, you're not sure it's quite right.  For instance, this blouse pattern required a tailored finish, i.e. topstitching around the collar and cuffs and up the center front.  But as we started working with this fine voile print, the top stitching was too "harsh" for my delicate fabric.

 
Topstitching...NOT!!! We ripped this topstitching out because it was not right for the delicate fabric.
Laurel always brings garments back for a fitting before the final sewing stages. It's important to try things on as you go, as ripping out is not fun (epecially if you've already serged the seams!) I also love that she isn't afraid to show me her mistakes - after sewing the cuff on the sleeve, she realized that she applied it incorrectly...and that's why we fit garments first.

"Never too proud to rip!!!"


During the fitting, we spent some time at the button wall, looking for just the right buttons for my blouse - I love how everyone jumps in with their choices whenever anyone even gets near the famous button wall at Stonemountain & Daughter! I wanted the buttons to add to the delicateness of the blouse, but not overwhelm it. We all settled on a pale irridescent pinkish-lavender button which pulled out the subtle color in the print.


"Sew Perfect, Sew Sweet!" It's a great addition to my Spring wardrobe.


I hope you have a chance to stop by and see many of the garments I have been blogging about. Visiting Stonemountain & Daughter in Berkeley is a gift to yourself. There is nothing like walking the aisles and feeling the fabric...sitting at the pattern table and seeing what inspires you…or taking a sewing class with us...


Creatively yours,
Suzan