Showing posts with label Here and There Top. Show all posts

Tuesday, March 12, 2019

Outside the Lines - Our Favorite Pattern "Hacks"

We all do it. It's part of the fun and satisfaction of making your own clothes. Some of us stick to the pattern for our first go at it, but if it becomes one of our go-to patterns, it doesn't take long before we are making changes to the pattern, just so all our garments don't look exactly alike. Maybe we will take inches off the hemline and turn a dress into a tunic.  Or maybe we will use the sleeve from one pattern and add it to another, peplums and ruffles added or removed, and so on.

Patterns hacks are prevalent among sewists who have been at it for a number of years.  It's all about the sewing adventure - finding the style, fabric, and fit that suits both your body as well as showcasing your unique fashion aesthetic. And interestingly enough, the indie pattern designers are even starting to put out "hacks" on their own patterns.  We love it!

We started this post thinking we'd list our top five pattern hacks, but after some meaningful dialog over lunch, Laurel and I listed at least that many in the first five minutes of our discussion. We've been at this collaboration for over five years, and I think our first make together was even a design hack. It was a Sandra Betzina pattern, a simple bias cut shell, that we decided to use two different fabrics – silk/lycra charmeuse and black rayon/lycra knit.


This photo feels so long ago! Can it only be 6 years?
Almost any modification can be considered a hack...something as basic as changing up the facing to bias binding on a neckline or armhole.

Laurel loves an all-in-one bodice facing rather than bias binding on the 100 Acts Of Sewing - Dress No. 1.https://www.stonemountainfabric.com/product/dress-no-1/ The pattern calls for the use of bias tape on the neckline and armholes, but a facing gives a nice clean finish that she prefers.

Dress No. 1


We've changed up this basic pattern so many times, we lost count. We've modified the neckline and length so we could layer a tunic version over a dress version.


And how many different ways can you change up a Sew Liberated - School House Tunic?


From gathers, to pleats, to changing the front opening, it's such a great pattern with so many possibilities. We've even added cuffs to the sleeves.


There are times when you just can't find the right pattern to fit the image that you have floating around in your mind. The real "hackers" will buy the closest pattern that matches that image then cut, paste, edit, change, etc. the whole pattern...sometimes combining a sleeve from another pattern or changing up a collar. It's a way to make a pattern your own. One reason why we sew is because we don't want to wear what everyone else is wearing, right?

Laurel draws on her patterns to help her visualize how they can be hacked.

Peplums and ruffles are an easy change to most patterns.  We added a peplum to Granline Studio's Linden Sweatshirt, a real favorite of many sewists.


The peplum turned out so cute and added a real feminine touch to this lightweight knit version.


And of course, adding a ruffle to any hemline, neckline or sleeve gives a simple pattern a whole new look. We made the Matcha top as designed the first time...


But the second version in a beautiful silk print was begging for a ruffled sleeve.


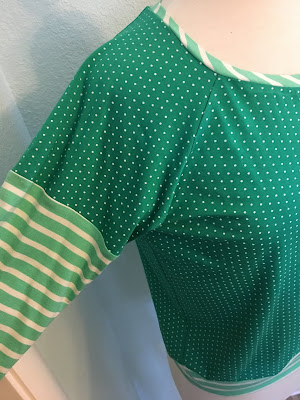
Who says you can't chop at a sleeve and change the whole look of the classic sweatshirt? Using a variety of colors and prints make your version unique. Color blocking and fabric variations are a hack of sorts, and always a winner. We love using striped knits as bias bindings. Let the textures and patterns of the fabrics create the drama.


Hacks can be as simple as an embellishment added for drama or in this, case to cover a flaw in the fabric that we overlooked at the cutting stage. We turned this Here & There dress into a top, but missed the center front fold mark in the fabric.


Fabric flaws happen occasionally...and sometimes we miss them.


No problem...a little bias strip and bingo!


We love 100 Acts of Sewing's Pant's No. 1. The easy elastic waist and loose fitting legs work up well in almost any fabric. For fun, we added some detail by adding cuffs with a button! Finishing with a button just adds to the individuality of your pants.

To make this hack, finish the side seams of the pants separately before stitching them together. Stop stitching a few inches from the end and press the seams open to create the split hem.

Create the cuff by cutting a strip of fabric that is twice as wide as the finished cuff + seam allowance. To make one tab, cut two pieces of fabric in the shape you would like + seam allowances. Click and download the template below to make a tab with the final dimensions of 4 1/4" x 1 3/4", including 1/2" seam allowances.


Sew these pieces right sides together, leaving the square edge open. Trim the edges, turn right side out, and press. Sew the buttonhole.

Baste the tab in position on the cuff piece, making sure to leave seam allowance at the bottom edge.

Fold up the seam allowance on the long cuff edge without the tab, wrong sides together. Fold the cuff piece in half, right sides together, and stitch each short edge.


Turn right side out and press. Attach the long edge of the cuff that doesn't have the seam allowance pressed up to the pant leg, right sides together. Fold the cuff and topstitch, stitch in the ditch, or hand stitch the cuff closed.

Sew a button to the other edge of the cuff and you're done! We like to sew the button a little further over to create a cute pleat at the pant hem.


What are your favorite pattern hacks? Please share your creative ideas and inspire all of us to continue to make our garments unique and special.

In support of your creativity,
Suzan
email me at fabriclady3@gmail
Stonemountain & Daughter Fabrics

Monday, February 12, 2018

Creating Clothes that Matter! From "Meh" to "Yeah!"

Being able to improvise with your sewing is a practiced skill. We have all tried patterns that don't work on our bodies or fabrics that turned out to be the wrong choice. As we continue to work on making clothes that matter, improvising when things go astray is a valuable tool.  There was a reason why we chose a pattern or a fabric in the beginning, so not abandoning ship at the first glitch not only strengthens our sewing skills, but also gives us confidence as we build our wardrobe.


Even the most experienced sewist can make mistakes, have wonky seams, and have to re-start garments. And sometimes the fabric works against creating that perfect garment. Initially, we chose this beautiful cotton from Anna Maria Horner's Loominous collection to make the Here & There Dress/Top, part of her new Simple Start pattern collection.


Choosing the fabric and pattern is the first step!

The top has two versions for the back - a "wrap" look or a diagonal insert, as shown above.  We opted for the Version B diagonal insert, but we planned to adjust the length for a top.

The Here and There top is indeed a "Simple Start" to your wardrobe. It has basically three pattern pieces: front, back, and back insert.  We cut our insert on the diagonal of this plaid. You can complete this cute top in five relatively simple steps:

1) Sew the shoulder seams
2) Attach the back center insert
3) Complete the bias bound neckline
4) Sew up the side seams
5) Finish off the sleeve and hem edges 

When pressing the garment, Laurel noticed a couple of things which might have resulted in a new addition to the donation pile.

1) The fabric had a slight fading down the center front.  This can happen to fabrics as they sit on the shelf or are exposed to light.  We try to catch those pieces before we sell them, but often the line is so faint that you can miss it in the layout.  This one we could not avoid.


Right down the center!!!!!
The second thing she noticed was that the back insert was a little wonky and upon a closer look, she realized that she had basically eliminated the tiny pleat on one side of the enter back, causing the whole back to hang funny.


We probably could have lived with the back thing, but since the whole garment lost some of its spark from these two issues, it was time to start ripping. It took as long to undo this mistake and fix it as it took to make the whole shirt! "Momma said there'd be days like this, there'd be days like this, my Momma said"....


The fix for the front fading line was simple enough.  Since the back had a nice diagonal insert, why not cut a bias strip and cover the faded fabric?  You have be meticulous in your cutting, pressing and pinning of the strip, but it's better than tossing out a perfectly wearable garment, albeit slightly flawed.


A good pressing and Voila! From Meh to Yeah!

We definitely need some cute buttons, right?

Love this back!!!

Making mistakes, poor fabric or pattern choices, and fitting issues are the three most common reasons people stop sewing for themselves. We agree that it's certainly discouraging to work hard on a garment and not be happy with the result. But learning from our mistakes and getting back on the horse is the surest way to eventually be happy with our garments. "I wonder how can I use this experience to help support me to make a leap ahead?"

As we just saw, when things don't go as planned, we discover more about the pattern, about the fabric, and even about our own life that can be shared with others. It truly is the time for us to give permission to ourselves to be really imperfect! It may be time to learn more skills you may need to cultivate through local classes, blogs, youtube, and other tutorials all around us.

You can even search through my previous blogs for inspiration. Check out what I did previously from some of the cottons from the Loominous collection!


Dress No. 1 from a previous blog

Top No. 1 is a hit! Read about it on this blog


We love how our InstaSisters from all over the world share their sewing trials and tribulations right there for us all to see (and learn from). Creating a Destiny Wardrobe (more details on what this is all about in my next blog!) starts with one successful garment that you love, so make it an easy one to get started.  Choose a fabric that speaks to you and ignites your vision. As you hone your skills and develop new capacities, you will find that wearing me-made garments or "Clothes that Matter" will boost your confidence, help you express your creativity, and inspire others. This is how we are catalyzing a worldwide movement. We are now creating a world that is more collaborative and interconnected. Your me-made clothes and my clothes make a huge difference and matter!

Let's turn towards the challenges and hold them without judgment about us and others.


Join me in contributing our gifts, whatever that looks like!
Suzan Steinberg
email me at fabriclady3@gmail.com
follow me on instagram - fabriclady3