Monday, August 3, 2015

Be Creative with Border Prints!

Some sewists shy away from border printed fabrics because they can't figure out a way to incorporate the design into their garment. In addition to the design challenges, it usually takes more of the fabric to work the border design into the pattern, as borders are traditionally only on one edge of the fabric. But we love a challenge, and we find that working with border prints can add a new dimension to a otherwise plain pattern design. My father, Bob Steinberg, always said "a good border print turns you into a designer!"


Inspiration from the High Style exhibit at the Legion of Honor Museum!


A case in point: a basic pants pattern can become a statement garment just by using a border print. The palazzo pants that we're so in love with would be even more stunning by incorporating a border print on the legs. I love getting creative with how the fabric can be laid out to create new design looks!


Border Print ideas!  Fabrics from left to right, top row - all available at my store, Stonemountain & Daughter in Berkeley:  Alison Glass batik, Cotton + Steel Hatbox lawn, Alexander Henry Stockholm cotton, Alexander Henry Frida cotton.  From left to right, bottom row:  Cotton + Steel Mustang cotton, Alexander Henry Djada Border cotton, Cotton + Steel Mochi cotton lawn, Alexander Henry Big City Print.


I also found a great way to use a border print on my new drapey top, New Look #6268.  What a perfect use for that soft, beautiful rayon! I love this top so much and want to make it again and again! It looks great belted or loose and flowing.


Laurel found our minty Cotton + Steel border print, designed by Rashida Coleman Hale.  This sporty fabric is like a cross between denim and linen.  It's still soft after a washing and yet it remains "weighty." Being the Leo that she is, she loved the touches of metallic gold.

Scattered Mint

Since the fabric is 44" wide, turning a pants pattern piece to fit on the width of the fabric works well - unless of course you have a 36" inseam.

We should mention that Laurel makes a lot of her own patterns, and her own go-to pants pattern is used over and over again, usually just modifying the leg length or width. She wanted a jeans look to her Cotton + Steel pants, but didn't want the traditional jeans styling. Her idea was to use something like New Look's 6163 pattern style, as she wanted a zipper and darts at the waist, rather than her favorite elastic waist.


If you have a favorite pants pattern, you can reinforce it by applying fusible interfacing to the back with a dry iron - we got that hint from Sandra Betzina in her last class here at Stonemountain. Laurel's pattern is in inexpensive cotton muslin, so it lays easily on the Cotton + Steel fabric. For these pants, she narrows the width of the pants legs and places them on the fabric with the border at the bottom of the legs.


Remember how we talked about incorporating the selvage edges of fabrics into your design? (See our post on Show us your Selvage Edges!)  Like many designer fabrics, the edges often have the name of the manufacturer and/or designer stamped along the selvage. And this Cotton + Steel fabric has a great selvage edge that would add to the casual jeans look Laurel was after.  Besides the printing, the very edge has a soft frayed look - perfect for jeans! So why not use it?

Laurel incorporated the selvage edge into the design of two front "patch" pockets.  A patch pocket is made by sewing a piece of shaped material to the outside of a garment.  You can make patch pockets any shape and apply them wherever you like on your garment - even if the pattern does not call for them.
Lining the pocket with a lightweight cotton.
The zipper was applied to the back seam, just because she hates side zippers - sound like a personal issue to me! ;) To finish the un-banded waistline, think about using double fold bias tape as a facing.  It has some give to it, since its cut on the bias, but it's sturdy enough and works great on the curved nature of a the waistline.

With the addition of another patch pocket on the leg (cargo pants style), these "jeans" are rockin'!

And here's the fabric designer's name!


Her only regret is that she got the idea to incorporate a patch pocket using the selvage edges after she had already cut out the pants - so the legs would have been too long by leaving the raw edge at the hemline. Would have been cute, though!  But that's the best part of sewing - using your creativity to change up your design as you go along.  You learn by trial and error.  So now that you know how you might incorporate the selvage edge into your pants design, you're already ahead of the game.  Let your imagination by your guide!

One of our students, Kathleen, used the fuchsia version of Cotton + Steel's linen/cotton blend in a Sandra Betzina Vogue vest pattern, #1453. She made clever use of the gold borders as well!


So cute!  Even if you've never used a border print before, we hope this shows you how great they can be!  Using a border print can really get your imagination going, since you may have to slightly alter a pattern or adjust your cutting layout.  But once you've figured it out, the results are beautiful, and the right border print can bring any garment to the next level.

Have you used a border print before?  Show us your pictures or better yet, stop by the store to show us all!

Creatively yours,
Suzan
a.k.a. Fabriclady!


Tuesday, July 14, 2015

Finding the Right Fit

One of the main reasons that we sew is to create a garment that fits us correctly. Most sewists will agree that getting a pattern to fit is the toughest part of sewing garments for yourself since our bodies are so different from the "fit model" and dimensions of the pattern.

19 years ago, I began our sewing school at Stonemountain & Daughter to help home sewists get the right fit, by having instructors on hand to help mark changes when you try on a garment, to teach students how to choose which size to make then adjust by measurements, and learn the easiest and best techniques for garment sewing. We offer over ten different classes focusing on different garments to fit (Make a Well-Fitted Pants Pattern, Make The E.S.P Dress, Fitting The Plus Bust) as well as our general sewing classes, perfect for continuing students, where you can bring in your own project and learn how to get the right fit (Beginning & Beyond, Mini Beginning & Beyond, and the ever popular and versatile Sew & Fit Lab).

Many beginner to intermediate sewing students give up altogether on sewing when their garments don't fit right and the idea of "how to fix it" is daunting. Because the challenges of pattern fitting can be so frustrating, we love when Sandra Betzina is back at Stonemountain teaching us how to fit a pattern or showing off her new patterns.

You always learn something new at a Sandra Betzina class. With her teaching style of no-nonsense, practicality, not too detailed or loaded with complex theories. Just great hints and tips on how to make a better fitting garment, she is the perfect guide through the puzzling world of pattern fitting. It doesn't matter how experienced a seamstress you may be, you still have something to learn from Sandra.

Laurel, an accomplished sewist for over 50 years, joined us for Sandra's Pattern Fitting class and I asked her what she nuggets of knowledge she acquired. Here the four NEW things she learned from Sandra's class:

1) Darts are a good thing.
It's perfectly acceptable to add a dart at any place in the garment.  Sometimes we can get too hung up on the original design of the garment and think that by adding or removing details from the pattern, we're ruining the original idea of the pattern designer. Adding darts to an armhole or neckline changes the way the bust or back fits, often for the better.
Quote by Charles James, American designer, at the High Style exhibit at the Legion of Honor in San Francisco 

2) Use the "lengthen or shorten here" lines.


Those little lines on your patterns are there for a purpose of a better fit.  Go ahead and cut that pattern on that line and add your length instead of trying to cut the shoulders shorter, the sleeve longer or the crotch deeper, which can create additional fit issues that are harder to correct. Just remember: whenever you lengthen or shorten, narrow or widen, add or subtract to one pattern piece, you will have a corresponding pattern piece that will also need to be adjusted so that the seams match up correctly. This means you will be adjusting more then one pattern piece.

3) The grain line on a pattern is THE most important feature on a pattern.
There's a reason why you lay a pants pattern on the straight grain line of the fabric: They will NOT hang well if the grain line is off and even a tiny difference to the grain line will make all the difference in the world for a great looking pant.


4) Once you have a pattern that works great, don't risk having that flimsy paper tearing. Iron on fusible interfacing to make your pattern durable.
Preserve your pattern pieces by applying a fusible interfacing fabric to the backs of the pieces.  Don't use steam to apply it or your pattern will shrink. What a great hint, given that many of us use the same pattern over and over again.


Most of the tips, hints and how-tos that Sandra covered in her class are detailed in her books Fast Fit and Power Sewing Toolbox 1 & 2.
Remember the 1-Hour dress by New Look (6347) that we had such a time fitting?  We're making it again and this time with a better fit. 
New Look 6347


This time we're using a gorgeous rayon batik from my stash. This dress would be great in any flowing rayon or soft drapey fabric!

Now that Laurel has a dress form in my size, fondly named Zanikan (fyi, my nickname is Zan - short for SuZan), she is able to make some changes to the pattern so that the dress will fit better.  

Another of Laurel's takeaways from listening to Sandra was that fitting at the bust is crucial.  In the original New Look 6347 dress we made, that bust darts were too low. So Laurel started on this second dress with fitting the point of the bust dart where it should be first and adjusting the rest of the pattern from there.


We are also adding a zipper down the back, even though the original design did not call for it.  The use of the zipper will allow me to get in and out of the dress so we can fit the back and waist to my torso.

Whatever your making, if you're not sure of the fit, then make a muslin first (we've said it before, and we'll say it again)  Once you have the perfect fit in your pattern, you will use it over and over again (a perfect excuse to iron on fusible interfacing, like Sandra said!). 

Having a dress form helps, Laurel admits. Both Zanikan and Laurel's Colette are a mainstay in her studio and boy, has she been cranking out the garments - some for her, most for me (yay!).
Verb for Keeping Warm Endless Summer Tunic, Grainline Studio Scout Tee, Vogue 1313, New Look 6268, Sew Liberated Schoolhouse Tunic

Creatively yours,
SuZan

We are also super excited to have Sandra Betzina back for an inspiring Fashion and Fabric Trunk show to inspire you on Thursday October 22, 2015 at 6:30. Please go to our website for more information. You can call us directly to register at 510-845-6106. Hope to see you then for this fabulous party and opportunity to play with Sandra in her "favorite" fabric store! 

Please email me at fabriclady3@gmail.com if you want more information about a class or the find the perfect class for you!

My fabulous team is now blogging at stonemountainfabric.blogspot.com

Here is a little bit of the latest blog and I encourage you to follow us there as well!


Stonemountain Style Hacking: Finding Inspiration In Ready-Made Fashion

It's summer and the fashion magazines and retailer catalogs are out in full force, touting breezy, comfortable, beautiful clothes. We are finding endless inspiration, flipping through these images and imaging how easy many of these outfits are to make. This post is all about dissecting and breaking down a ready-made or ready-to-wear outfit, so you too can say, "I can make that!"

 To best re-create these styles, or to hack them, we look at three very important elements:

  1. Take note of the cut of the garment and drape of the fabric (i.e. where the seams are and how the fabric falls on the body).
  2. Search our pattern books to find a similar style to the garment we wish to recreate. 
  3. Search Stonemountain for a fabric that best matches the fiber, drape, weight, and overall look of the inspiration piece. 
to read more, please click over to stonemountainfabric.blogspot.com

Monday, June 22, 2015

Summer Tees....

With warmer weather just around the corner, we're already starting to revamp our closets and drawers to move out the sweaters and jackets to make room for easy breezy summer garments. And nothing says summer like a summer tee shirt. They are a warm weather staple - easy to care for, cool to wear, and best of all, easy to make.


When we get new designs in from our independent pattern designers, we always try out the tee-shirt patterns. Shapes' Four Good Measure top is a loosely fitting tee that we made out of several knits last year, including a digital print from France.


Tilly and the Buttons' Coco tee is a snap to make.  Laurel made the longer version in a rayon print.


Pamela's Patterns has "The Perfect T-Shirt." We have used this pattern several times, using various knits.


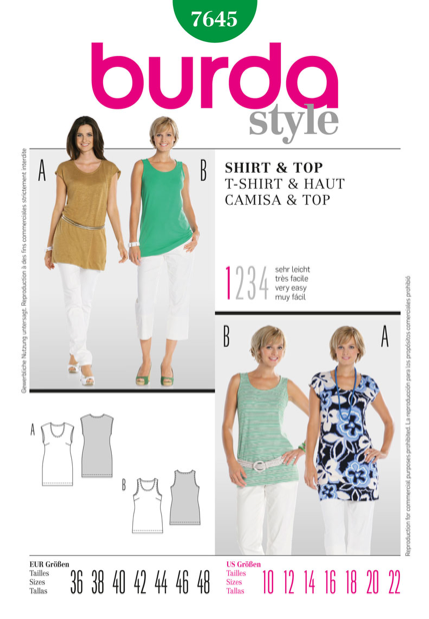
And we loved Burda's easy t-shirt pattern, #7645. (We also made the tank!)


This month, Grainline Studio's Scout Tee caught our eye. It's not very often that you find a tee pattern that is designed specifically for woven fabrics, so we thought we'd give it a try.


We chose a soft lightweight cotton lawn.  The pattern has a lower back hemline than the front, short cap sleeves and works up in a jiffy. It's the perfect little tee for the beginning sewist.  In fact, we're even teaching a class specifically on this pattern in August and October!

You could wear it out, tucked in, or belted! 
Summer perfection!!


Laurel made her Scout tee out of one of our lightweight Ikats.
Now that will look cute with jeans or shorts!


She also gave the neckline a little extra detail by just letting some of the bias facing show and then stitching it down in the ditch.


Think about making this pattern up in a pretty silk...wouldn't that be great paired with some jeans for a "casual elegance" look at a Summer music festival? I'd love to see it made up in a soft Rayon challis too.  Even a lightweight linen?

I love this Scout Tee so much, Laurel is making me two more cotton tops for this summer!!!


Last but not least, I love my new favorite flowing top, New Look 6268!!!


Sew many choices!

Cheers to a summer full of sewing up essentials that will last season after season!

Happy Sewing,
Suzan


Wednesday, June 3, 2015

Loving the ethnic fabric and free flowing ease!

We are all over the ethnic look for this summer.  Some of our imported gauze fabrics from India are just perfect to get that free-flowing look so prevalent in the 60's and 70's.  And the best part is that they never seem to go out of style and are perfect for any age!

I wore my gauze palazzo pants, New Look 6271, on vacation and loved them so much that we made a second pair. My wonderful Burda 7645 rayon/lycra knit top is the perfect pairing!


 Laurel made her pants out of this lightweight rayon challis... yum! If you weren't blessed with long willowy legs, make these pants extra long, pair them with some wedge heeled shoes, and voila! You have that long lean look!


These wide-legged pants look great with a tee-shirt or even a more loose blouse,
 such as New Look 6268.  This is another very easy blouse to work up.  


We chose another imported gauze with a border.  Laurel placed the pattern pieces on the cross grain of the fabric to make sure we highlighted the border along the selvage edge of the fabric.


Again, this pattern uses a self belt, but it would look cute without the belt.  Very soft and flowing!

 And since we're gaga over gauze, we thought A Verb for Keeping Warm's "Endless summer Tunic" would be fun to make up in a cotton gauze.


We love the quasi-batik look of this cotton crinkled gauze or try one of our cotton double gauzes! . 
Can't wait to see this little number finished!

All of these patterns are a breeze to sew and we love the infinite variety that just one pattern can give you by using different fabrics.  Drop in to pick out something fresh and breezy to add to your Summer Wardrobe!

creatively yours,
Suzan
Stonemountain & Daughter Fabrics
in the creative hub of Berkeley!

Stop by our website or store for a visit to our creative well!