Tuesday, May 24, 2016

Crazy-Making Patterns - What was I thinking?

Fact: Not all patterns are created equal from a design perspective.
Fact No 2: Not all patterns instructions are correct.
And Fact No. 3: Tastes and preferences change over time

Some background:  We made a decision a few months ago to focus on Independent Designers. We  had some pricing issues with a couple of the Big 4 pattern makers and it just seemed the right time to let them ease out of our pattern drawers. We continue to support our favorite mainstream designers from the Vogue pattern line, specifically Sandra Betzina and the Tilton designers.

So even though we have been focused on promoting our Indies since January, we had some hanger-oners in the project pile that for whatever reason, Laurel just hadn't got to yet. One garment was this Vogue 9124 Dress, which we picked out last Fall. We chose to make it in a beautiful rayon border print.  So before Laurel had a chance to start the sewing of this garment, the weather turned and it seemed fitting to save it for this Spring. And since she had already cut the pattern out last Fall, there was no going back now.


Skip forward to this week when she actually started sewing on the dress. Vogue patterns are not always suitable for beginners, but if you look at the drawing on the pattern, it looks rather straight forward, especially for an advanced seamstress like Laurel. The pattern features a button fly front, which for someone who has done a lot of plackets should not be that difficult.


Here's where the "Crazy-Making" started. According to Laurel, who always tries to work up our patterns as they are designed, her sewing day went rapidly downhill. "Worst placket directions ever!"


After a sleepless night trying to wrap her brain around their instructions AND scouring the Internet for some pointers, she scrapped the instructions and, as she says, "I did it MY way". She wasn't alone, as others had the very same trouble with these overly complex instructions and bad drawings.  (Not to mention, one whole section is totally out of order!)

So we're thinking that if you do choose this pattern, just go back to the fly-front technique that you already know. On a blouse fly front, the center front on the right side is normally cut about 6" wider and just "folded" to form the placket.  Since she had already cut out the bodice months ago, Laurel cut a section of fabric and just added it to the right front of the bodice, to form the hidden placket.


The placket is then created by folding the fabric in an accordion-like fashion. The inside (hidden) portion of the placket is interfaced - this is the portion that has the buttonholes down the front.


The outside portion of the placket hides the buttonholes down the front of the bodice and is not interfaced. The left side of the bodice is interfaced to add some stability - this is the side for the buttons.


Narrow bias bands like this neckline band can tend to stretch as you are trying attach it to the gathered bodice.  Cool trick: Laurel marked a piece of bias tape with the various pattern markings on the narrow band around the neckline, just to make the gathered bodice a little easier to assemble. The bias tape also made the gathered neckline more stable.


A word of warning - these tiny bands are not easy to master - they're not for the beginner or the faint-hearted. And even though gathering a skirt is something you might learn in your first years of sewing, they can be a pain on lovely silk or rayon like this fabric - they're slippery and they ravel, so serge the edge first before gathering.


I have a spring wedding to attend, so this little spring number might be just the trick. Either that or I might have to find someplace to have afternoon tea...maybe add a big flouncy hat??? Just kidding...if you know me at all :) 
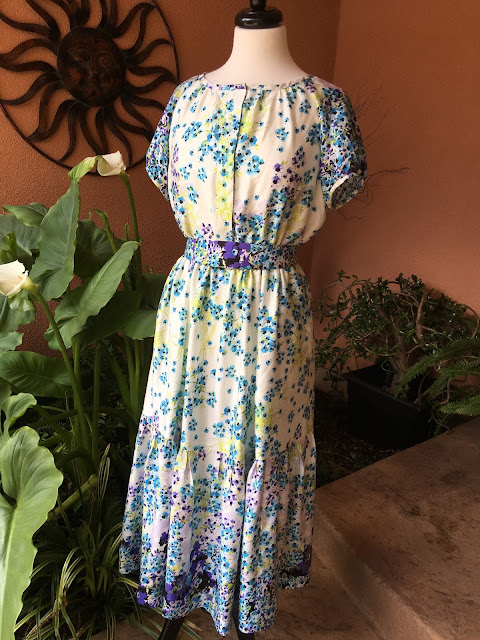
Don't you love the pretty belt Laurel made for me!
We love border prints and all the design options they give us!


My buying team and my pretty new dress!!! 
Given the "issues" inherent with this Vogue pattern, 
I'm thinking I made a great decision to GO INDIE!!

Cheers to Sewing!

Suzan

Tuesday, May 17, 2016

Betty and Lizzy House - A Contest!!!

Lizzy House—a fabric designer for Andover—is sponsoring a dress making contest, and we wanted to play along! We just love the whimsy of Lizzy House fabrics, so we were excited to get our Stonemountain community involved. The main objective of the Lizzy House Dress Contest is to "inject a little joy into your wardrobe and maybe learn a new skill or just show off your wicked style, and create a bit of community doing it."


To enter, use any Lizzy House fabric to make a dress for yourself, a dress for a little one, or any kind of garment for the men in your life.  There's also a category for kids who make a dress themselves!  Then post a picture on Instagram using the hashtag #lizzyhousedresscontest, and if you got the fabric from us, tag us too with #stonemountainfabric!

For our Lizzy House garment, we chose to bring a little "Betty" into our wardrobe. Sew Over It, one of our new indie pattern lines, seemed to be channeling a little style from the ladies in the hit series Mad Men. We loved Betty Draper's on screen spirit and the chic 50's vintage look she inspires.


The Betty Dress reflects that simple 50's style and is the perfect pattern for our Lizzy House dress. 

Link to pattern here!

We chose a soft "Meadow blue" cotton lawn for our Betty Dress. 

Link to fabric here!

The contest ends on May 20th.  We have a great selection of Lizzy House fabrics in the store for you to choose from, so drop by soon and join in the "make it yourself" fun! After all, it IS Me Made May!!!  Just make sure to tag your completed look with #lizziehousedresscontest and #stonemountainfabric.

We'll post pics on Instagram and Facebook when ours is finished.  Stay tuned!!

Creatively Yours,
SuZan

Tuesday, May 3, 2016

A Pretty Tendril for Me Made May!

A tendril is a tiny stem that wraps itself around a host or another structure to add support for a climbing plant. We see them in nature frequently, twining themselves around larger stems and sometimes setting the path for new growth.

I'm not sure if it was intended or not, but A Verb for Keeping Warm's "Tendril" dress seems to mimic the action of nature.  The Tendril is a bias cut dress which shares the common characteristic of wrapping itself around the body, clinging to our curves in the most flattering of ways.  It's no accident that the most luscious of silk nightgowns we love are cut on the bias in this same manner.

The Tendril is an easy pattern, with only two pieces, but as the designer suggests, you will learn a little about French seams and sewing on the bias of the fabric. Won't you join me for #memademay16 and make one of these wonderful bias dresses - it would even make great lingerie!


One of my goals this year is to give an honest evaluation of our indie pattern designs, since we are beginning to focus solely on them here at FabricLady. We want to point out areas that might cause you "pause", as we say, while you are working with Indies. Not everyone will like a particular pattern or designer - we all have individual preferences and aesthetics. So without denigrating the Tendril's beautiful design which we love, the pattern itself may present a couple of challenges for the beginning sewist:

1) The actual sewing directions for the dress is a scant one page without a lot of details about sewing a bias cut dress, and

2) In order to save paper (we're assuming), the front and the back of the dress are printed on top of each other, necessitating the need for tracing the pattern onto another sheet of paper before cutting out. This may not seem like a big deal to some of you, but some sewists (Laurel?) find it unnerving/irritating. (Can I have some cheese with that whine...)


And since we see this more often, we might suggest that you make a trip to Stonemountain and pick up a roll of pattern paper. It can become handy in the workroom as it is sturdier than the flimsy tissue that a good number of patterns are printed on and less bulky that the heavy paper that many of our Indies use.

But let's wrap ourselves around the Tendril. We chose a soft double gauze polka dot fabric, which we think will lend itself very nicely to the flattering bias cut styling. The fabric is a generous 54" wide so the bias layout was a snap.  The polka dots on the bias of the fabric also make it a breeze to cut the bias strip "facings" for the neck and armholes.


The French seam finishing is used in the shoulders. Easy as Pie! The instructions in AVFKW's sewing notes are easy to follow.

Step One:  Sew using 1/4" stitch with the fabric WRONG sides together..

 Step two:  Trim the seam allowance, align RIGHT sides together, sew with a 1/4" seam.


Voila!! A French Seam.


Reading the pattern notes seems to indicate that French seams are also used on the two side seams. But since we want the side seams to have the same soft draping that the bias cut allows, we decided to finish the side seams with a little more give, i.e. stretch, by using a knit stitch.

We tried out several on a scrap of our fabric to find the best machine setting.


After the bias strip facings were completed, we sewed the side seams using our stretch knit stitch and then rather than serge the edges (serging can be tight), we just simply finished off the edges using a big zig zag stitch to keep the seams from raveling.

  
We added lace hem tape to keep the bias hem edges in check and then sewed the hem in place by hand.  The beauty of double gauze is that if you don't want hand stitches to show on the outside of the garment, your tiny stitches should just catch the under layer.


This dress is so flattering on Zanikan...can't wait to wrap it around my body:)


I'm so excited to have this dress in time for Me Made May!  For those of you who don't know, Me Made May is a month long celebration of our handmade wardrobes.  Many people challenge themselves to wear a certain number of me-made garments a week, or even every day!  You can read more about it here.  And follow us on Instagram to see our daily me-made outfits!

Creatively yours,
Suzan